
The ultimate itinerary of hiking Havasupai and Havasu falls in Arizona
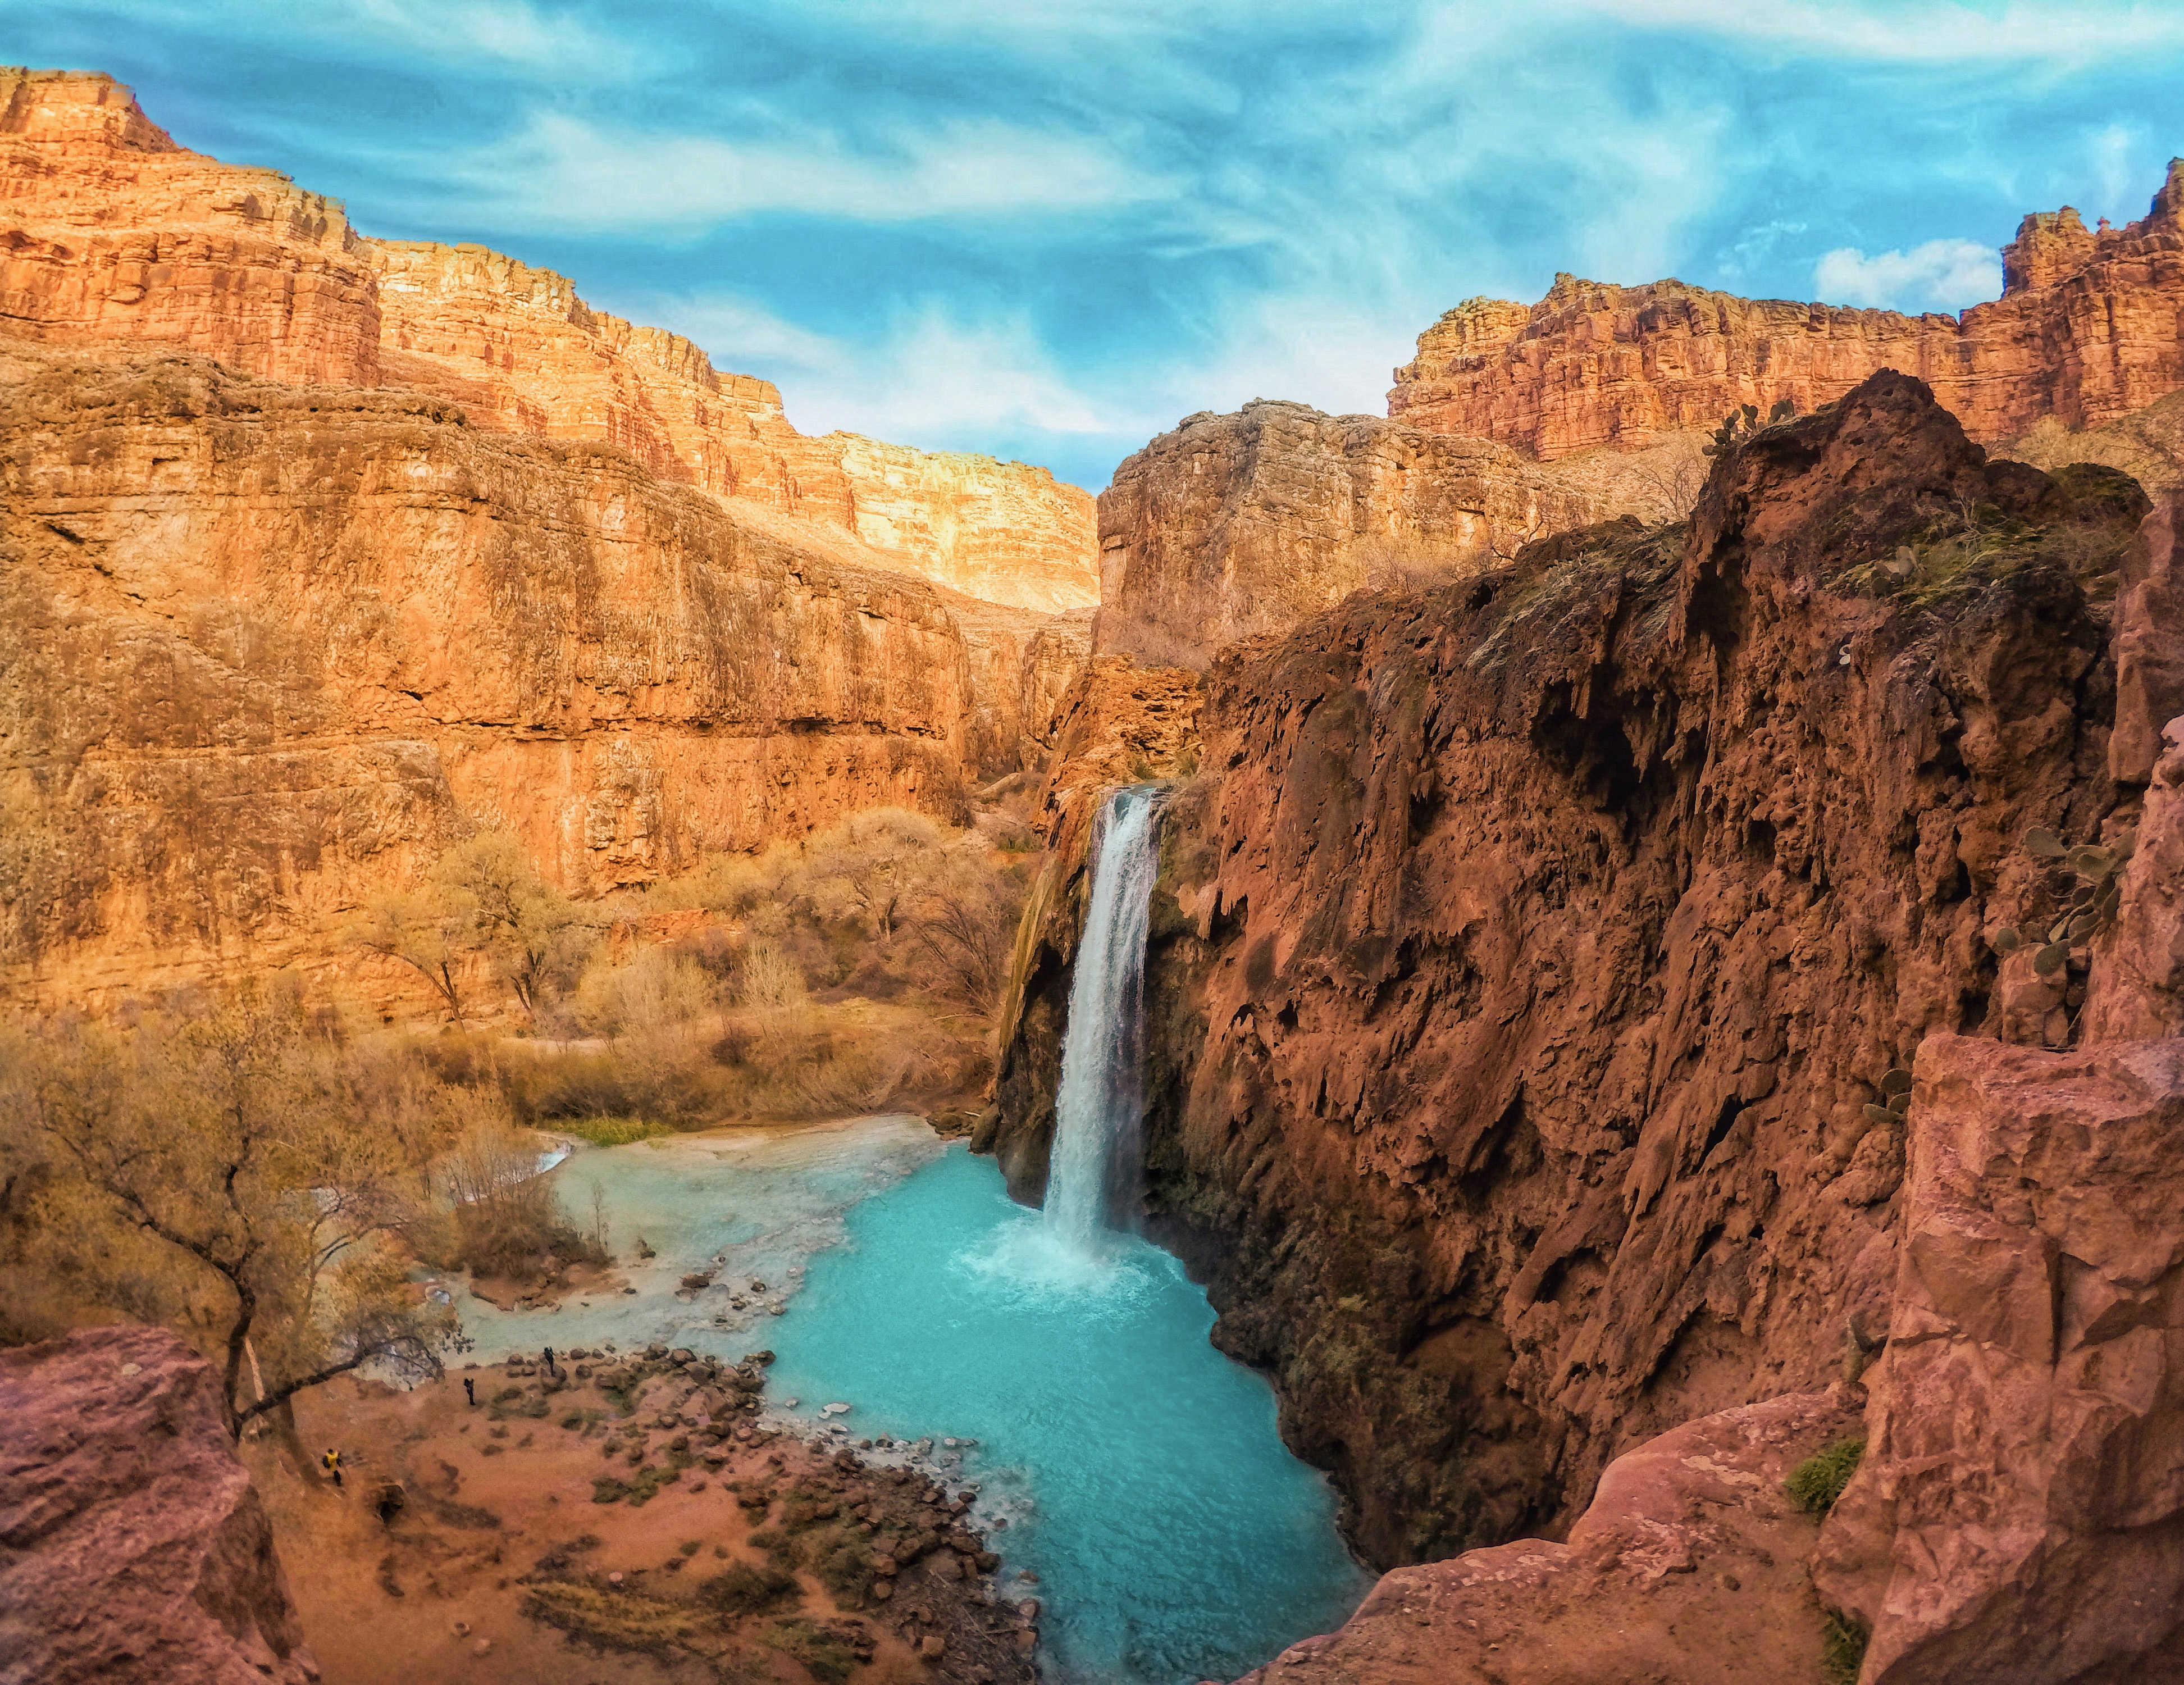
The word “Havasupai” means “people of the blue-green waters”. Imagine a place consisting of multiple waterfalls cascading into mystical pools of aqua-blue water, shining brightly over lush, perfectly contrasting orange canyons! Well, that is Havasupai – one of the greatest places in the world!
A little bit about Havasupai
Havasupai village is isolated from the world and accessible only through this long-tedious-yet-super-adventurous hike or by helicopter. This entire area is known as Havasupai Indian Reservation and Havasu Falls is one of the five waterfalls located in this area. Havasupai region is governed by the native tribe known as the Havasupai Tribe. The Supai village, located on the Havasupai Indian Reservation, is currently the most remote village in the United States. All of their supplies are provided via helicopters or mules.
To reach the waterfalls, there’s a strenuous 10 miles hike to the Havasupai Campground. From here, there are further hikes to multiple waterfalls. However, day-trips into Havasupai are not permitted, and each visitor must have permits and reservations to the campground. The hike to Havasupai Falls is not a random hike that anyone can do without any preparation. The key to making this hike memorable and successful is proper planning and preparations. So, let’s start, shall we?

When to visit Havasu Falls
- February: It is super COLD but we decided to hike during the last week of February because first, it is not crowded and second, that’s the only permit we could get!
- March-May: These are the best months, the climate is pleasant and fantastic for this hike.
- June-August: Summer in Havasupai is super HOT! You’ll need to hike either early morning or late at night or else the heat can feel unbearable. Also, July and August are monsoon months so there are chances of the flash flood which turns these waterfalls muddy.
- September-November: September is pleasant but it gets colder after October mid, but these months are good if you want to avoid the crowd. Beware of flash floods though!
- December-January: Closed due to winter months
How to Get a Havasupai Permit
The most difficult thing about planning a backpacking trip to Havasupai is getting a permit. Yes, you heard it right! You can’t go on a trail without securing a permit. And these permits sell out for the entire year in a few minutes after the reservation lines open.
Here’s a link where you can find all the information about getting a permit: https://www.havasupaireservations.com/
Also, No day hiking is allowed, that means you can’t hike in and hike back on the same day. All reservations are made for 4 days/3 nights only.
Getting to the Havasu Falls Trailhead
The trailhead is located at Hualapai Hilltop Parking Lot which is at the end of Indian Road 18. The best way to reach the trailhead from our city, San Francisco was to take a flight to Vegas and drive to Hualapai Hilltop from there. We flew to vegas a day before we were supposed to start our hike and drove from Vegas to Hualapai lodge. This is the nearest lodge from Havasupai trailhead where you can spend a night and start your hike early morning. Some people also camp in a tent near the trailhead but the choice is yours.

Pro Tip: Make sure you have enough fuel in your car to cover about 200 miles of driving before you get onto the Indian Road 18. The closest gas stations are about 70 miles away from the trailhead.
All other FAQs regarding camping, hiking and most importantly our guide on “What to Pack for Your Havasupai Backpacking Trip” are at the end of this blogpost!
And our ultimate Havasu backpacking begins…
If you have followed my previous adventures, you know how much preparations I do on my hikes or any trip for that matter. And for me, this was the ultimate hiking experience that I have been waiting to go on for 3 years. Veer, Tanay and I (I am Madhura btw, nice to meet you!) were super pumped, our backpacks were packed and we were all set to go! Until… we got the news that there’s no way to reach the Havasupai trailhead! All the roads were blocked due to heavy snowfall, perhaps a snowstorm! The biggest snowstorm Arizona had ever seen! We knew that our adventure had begun.

We had to postpone our entire itinerary by one day, and the Havasupai reservation office was very responsive to emails and calls and provided us with all the help we needed. We were just waiting in the Hualapai lodge, sipping on hot chocolate, waiting for one ray of sunshine. Somehow magically by the end of the day, snow started to clear out and we were back on the road!

Overview of Havasupai region:
Hiking Distances From Hilltop (In Miles):
Wash Basin 1.5, Havasu Basin 6.2, Supai Village 7.1, Rock/Navajo Falls 8.7, Havasu Falls 9.5, Campground 10, Mooney Falls 10.8, Beaver Falls 13, Colorado River 19

Day 1 – Hike to the Havasupai Falls Campground – 10 miles
We parked at the Hualapai trailhead parking lot around 8 am and as soon as I got out of the car, my feet and hands were numb due to the cold. It was 0 degrees Celcius outside. On all 4 days, we survived at a low of minus 10 degrees at night and a maximum of 8 degrees during the day. It wasn’t the best weather condition but definitely made our trip one hell of an experience. We put on some hand and foot warmers and set off on the trail.

The hike took us about six hours considering the first patch of the trail was covered in snow. We also spent a lot of time looking around, admiring the beauty of canyons, taking pictures and of course throwing snowballs at each other.

We started our descent into the dusty Arizona Grand Canyon on a snow-covered trail. The majority of the descent is in approximately the first 2 miles and not difficult since you are hiking down.


We completed the initial switchbacks and finally were in the dry river bed. The hike here was a bit slow due to the sandy gravel, but the views were mesmerizing. At every mile on this hike, views kept changing from snowy trails to orange canyons to rivers and whatnot. On this trail, you will feel like you’ve lost the trail quite often, but just keep following the river bed until you meet back up with the path. Make sure to download offline google maps beforehand to avoid getting lost.

Tanay climbed a few weird rocks in the canyon and hobbled around rock formations like a geologist! Veer and I were capturing interesting angles and compositions of the massive and breathtaking canyons that surrounded us. I had packed way too many nuts and energy bars in my backpack that literally saved our lives on the hike.


This hike gave us a very unique experience that I can’t quite put in words. Most part of the hike, there were no humans apart from the three of us for miles. As our feet stomped along the rugged trail, we had many meaningful conversations about life, spent some time listening to good music, and self-exploring. It felt like we were on the most peaceful part of the Earth; we never felt more alive.


Tip: There are no water sources available on the trail, so make sure you pack enough water for the hike.
Five hours and 8 miles later into the hike, after witnessing drastically changing landscapes, we finally reached Supai Village. Continuing into the village, passing by small homes and ranches and pack mules, we stopped at the reservation office to get our wristbands. This village was very unique, literally in the middle of nowhere!! The tribe members were busy doing their daily chores, there were children playing outside; some people were sitting outside and having conversations in their language, while the others were busy traversing across the reserve on horses. Most corners were occupied with dogs and horses basking in the sun or lying in the shadows. This was a complete paradise for me, I always wanted to experience such a part of the world, experience their lifestyle. How did a place like this exist so deep within the Grand Canyon? We were in complete shock. I love talking to locals whenever I visit new places but honestly, I didn’t have a good experience in Supai village. Most of the Havasupai tribe members were not friendly, they like their privacy and ignore the existence of all the visitors.


After spending some time in the village, we started hiking towards campgrounds. Just a few minutes from the village, we could hear the melodious sound of running water. The hiking from here was so dreamy, following Havasu Creek through beautiful, aqua-blue water. It was hard to believe that the water was so crystal clear and blue.


One more mile later, we made it to the ultimate beauty: Havasu Falls. We made it. We really did. The first time I looked at this waterfall, I couldn’t keep my eyes off of it for five minutes. Overwhelmed by its beauty, we all took a moment to admire this place and let the mist from Havasu Falls brush against our skins and reflected on our long adventurous hike in.

After a lot of inspection and strategy, we found the best campsite near the water and had an amazing view from our tent. We settled in, made some food, and we were done for the day.

Day 2 – Mooney and Beaver Falls (and back) – 5 miles
After surviving in -10ºC, I somehow managed to wake up early. While Veer and Tanay were still enjoying their extra hours of sleep, I made us some hot chocolate and food for our day hike.

Mooney Falls
After walking for 10 minutes we reached Mooney Falls. The toughest challenge of this entire trip was right in front of us – Getting down to Mooney Falls. The only way down to Mooney was to traverse down the canyon’s face using muddy, wet chains and ladders. When I say this is the scariest thing I’ve ever done in my life, I am not even exaggerating. Maybe that’s the reason they have put “descend at own risk” sign at the cave entrance. After the cave is when the descent started to get just a little bit crazy. I assure you if I can do it, you’ll be fine too!


")


Mooney Falls is so powerful, that the rocks and chains were soaked in water, and thanks to the impromptu rain for creating extra slippery surfaces. I was nervous at this point. I knew one little slip could easily lead to my death so I made sure to go slow and steady. When my feet finally touched the ground…it was the BEST feeling! Looking at the beauty in front of my eyes…I forgot everything that I had to go through in the last few minutes. I was speechless.

Mooney falls has its own charm, it stands over 200-feet tall, like a captain of all the waterfalls, dumping crystal clear water into aqua-blue pools. Since we were here so early, we had the waterfall to ourselves. Mission successful. After taking a few good photos, we immediately took our layers off and jumped in the water. Oh-my-god! I never imagined water could be this cold. But your body gets used to the temperature in a few minutes. Just hang in there!


You could spend a ton of time at Mooney, but we wanted to keep moving and get to Beaver.

Beaver falls
Beaver falls is about 4 miles hike from Mooney Falls. The hike is easy but tiring and adventurous so I would recommend starting this day early around 7-8 am to make sure you come back before sunset. Because the only way to get back is to climb up the rock that you descended for Mooney falls. Getting to Beaver Falls involves crossing three rivers and wading through the water, so don’t forget to pack your water shoes for this hike, I found them very useful. I wore waterproof hiking pants so I didn’t have to fold it every time I went into the water.


For me, hiking to Beaver Falls was really exciting, it is shady at times, rugged trails in between river crossings, trek through fields of wild grapes with stunning views of the massive Grand Canyon walls, with some getting-lost-in-jungle moments and much quieter than previous trails! At times, it felt like I was in Jurassic Park! From Mooney Falls, you just need to follow Havasu Creek downstream, requiring to wade in knee-deep water through at least four river crossings and some footbridges. The fun fact here is that the boys jumped into the wrong waterfall, thinking that we reached Beaver Falls. After getting strange stares from other hikers, we realized that we are at the wrong waterfall. We hiked for another mile and finally reached Beaver falls. The indication that you are close to Beaver falls is you will see a small ladder and some picnic tables.


Beaver falls are my favorite amongst all Havasupai falls. It is a series of smaller waterfalls that build swimming and wading pools from the water that cascades over the sandstone and limestone terraces creating picturesque views. Once you arrive, you can enjoy swimming in many pools, cliff jumping, and climbing up, down, and all over the falls. After all the jumping and shooting, we sat there eating our food, living those quiet and peaceful moments.

Make sure you have enough time when heading back from Beaver Falls since you have to climb back up to the campsite before it gets dark. Beyond Beaver Falls, it is possible to hike to the confluence of the Colorado River and Havasu Creek, but we skipped it considering its difficulty level.
Day 3- Havasu Falls
We woke up late after being tired from a strenuous hike the previous day. Today’s agenda was simple and clear: Chill at the Havasu Falls.

The basin of Havasu Falls was roaring. We took our time to explore each and every corner surrounding this waterfall, we even found a small cave on the right side of Havasu Falls. It is definitely a paradise for photographers. Veer and I were capturing this beauty from every weird angle possible until our memory cards were full. Tanay hiked to the top to capture some action on his GoPro, while Veer and I stuck around the basin capturing some more interesting shots.


We spent the afternoon chilling in the water, eating food and reading novels in our comfy hammocks. The shining golden glaze on the canyons indicated that it was already time for sunset.

The sky was clear and perfect for stargazing. We took just one photo of us in front of our tent in the background of millions of stars. For the rest of the night, we spent our time finding star constellations, watching shooting stars, and feeling blessed about being a tiny part of this infinite universe.

Day 4- Hike back to the parking lot – 10 miles
On our last day, we woke up at 6 am to hike out. If you go during the summer, make sure to leave even before 5 am to avoid heat. It took us way less time compared to when we hiked in. We also took quick stops at Navajo and Fifty Foot Falls on our way back.


Honestly, I was really really happy about this entire trip. Surviving sub-zero temperatures, snowstorms, climbing some of the scariest rocks I have ever climbed, hiking for miles and miles, crossing multiple rivers, walking through caves, camping in the wilderness and having the perfect digital detox – it was all worth it!! All I remember is being happy and enjoying the beauty of life at the moment. Havasu is good for that. You sort of lose yourself in its beauty.


FAQs:
- Where to park at the trailhead: There are plenty of parking spaces at the Hualapai parking lot for all visitors and there are currently no fees. Keep monitoring their website for any new changes in these regulations.
- Where to Camp: All the camping spots are on a “first-come-first-serve” basis. The campground area is located between Havasu Falls and Mooney Falls in the Grand Canyon. Also, there are a ton of trees that allow unique hammock camping options!
- Where to Get Water: There are water springs to fill up your water cans/bottles and are located at the entrance of the campground. We carried a portable water drum that we used to fill with water every morning.
- Bathrooms: There are 4 maintained bathrooms dispersed along the campground area.
- Food: Since this is a remote area, there aren’t any stores or food places. The closest food source is about a 1.5-mile hike from the campground in Supai village. We carried REI camping meal packs, backpacking stoves and made our food every day.

There’s also one stall near Havasu falls which serves frybread, but it was closed when we were there.

- Additional services: If camping and hiking is not your cup of tea and you would want to experience Havasu in a luxurious way, then there are fancy options like helicopter rides and staying in Havasupai Lodge at Supai Village are available at additional cost. More information available here:
- Helicopter https://waterfallsofthegrandcanyon.com/havasu-falls/havasupai-helicopters/
- Lodge http://theofficialhavasupaitribe.com/Havasupai-Lodge/havasupai-lodge.html
- Havasupai Mules: If you have excessive stuff that you don’t want to carry yourself, there is an option to have pack mules carry your gear in and out of the canyon. For this, you must make a reservation online while securing a permit. More information available here: https://waterfallsofthegrandcanyon.com/havasu-falls/horseback-riding-to-havasu-falls/
- No Trace Principles: Please, don’t forget to take out your own trash. Whatever you pack in, pack it back out. Let’s make sure to preserve our nature so that even others get a chance to come to visit this place.
- Photography tips:
- Bring your tripod. Tripod will let you keep your camera steady for long exposure shots and also help to capture group photos jumping in the water.
- A wide-angle lens will help you in capturing these amazing landscapes.
- Consider bringing some props to elevate your pictures. (I did bring my travel journal, stickers, hat, etc)
- Protect your camera with a waterproof cover.
- Bring bright and colorful swimsuits for pictures, avoid orange and blue colors since they are primary colors of falls and rocks at Havasupai.
- You can also do just phone photography since most of the newer phone cameras are really good.
Our ultimate packing list:
Follow us on Instagram for more fun adventures: @the.dream.mapper and @veer_and_wander


Terrific blog with all necessary information and of course great pictures 👌🏻Loved it
Really useful and well written! Can’t wait to go here!
Wow, wow and wow!!!! Much needed information.
Just wow .. !! ❤️❤️❤️
Amazing blog Madhura!!
Was waiting for this blogpost for long. Everything so beautifully summarized and just so informative. Keep ’em coming !!!
Great Article and fun pictures!! How did u store food? I heard lots of squirrels and Marmots on site.